Showing posts with label Pattern. Show all posts

Friday, 18 October 2013

New "Rust" Collection on Society6!

I'm really happy that I've recently discovered Society6! It gives me a chance to put my designs onto things I've wanted to for a long time, but have had no way of physically doing it. Although I'd prefer to be making everything myself, for the time being this is the best possible solution I can see! And it does have it's positives with people being able to promote and comment on your designs! 

So without further ado...


Available on all kinds of products! 
You can find the website here: http://society6.com/Elmerchant/Rust-aKd_Print

Sunday, 15 September 2013

Pattern Sneek Peek!

Inspired by some simplistic art work I found online, I've recently been creating a pattern for a competition. I don't want to give too much away as of yet though but here's a little preview of some colour options...


Thursday, 8 August 2013

Branding Project: More Logo Tests

Last week I continued working on the 'Coral' project with some different ideas. 

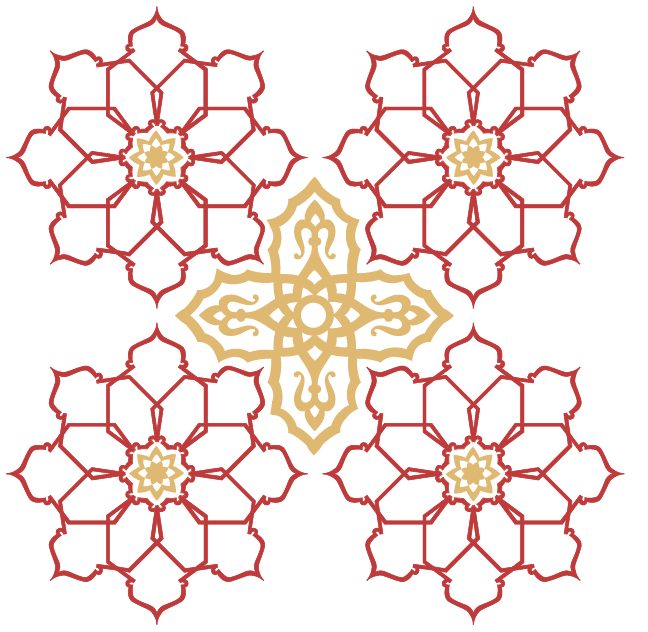
Considering the brand is meant to have lingerie and swimwear strands (under the name of 'House Of Coral') then I thought of using something lacy looking to encompass this. Something girly, flirty and fun.


My first idea was to use something that looked like the lace you find around the top of a pair of stockings and then fill the centre with a title. I quite like how this looks overall but I'm not sure how well it'd work as a logo on its own.


From there I wanted to try something that would look like a cut-out / stencilled look - and possibly something that could be laser cut to achieve this...

This is where my ideas led me... 


I thought that this kind of design would work well if it was used for a clothes tag or a price tag.
The side design could be cut out with a laser and it could be quite elegant looking. 


Similarly, I thought that something like this might look nice for a tag or logo or shop front design.
However, as nice as it might look I was concerned with the practicality of cutting something out this small... There's bound to be a better way or simpler way to do something elegant and fun...

Further designs to follow soon... :)


Thursday, 11 July 2013

Moroccan Patterning: Repeat Pattern/Texture (Final Option)

The final option I created for the Moroccan food van I was asked to design for (at my internship) was a repeat pattern I made using a pattern I found and a texture that I created. This actually turned out to be my favourite result of them all, and annoyingly it only took me about 1 minute to create as I was messing around with some Photoshop effects for some ideas, and this happened! 

Yet again, it's another case of a happy accident when it comes to me creating patterns!

I kinda hope the client picks this pattern to cover his van!
It's definitely the best, in my opinion!


Wednesday, 10 July 2013

Moroccan Patterning: Continued

As a continuation of my post from yesterday, here are some examples of colour schemes I began playing around with after deciding on my pattern. Moroccan colours are generally quite earthy and golden, but their flag also has green in it. I tried to consider this when choosing my colours.


1. Red and Gold (simple but effective)


2. Green and Gold.
I developed the flowers a little further here by adding in some detail to their centres


3. Red, Green and Gold.
My favourite of the three. Bold, rich and lively.


I also played around with some other shapes and textures to try to create a mosaic/tiled effect.
Below is an example of what I mean.


I also tried creating a simple texture in Photoshop, which I'm aware the boss doesn't favour using (and which I'll post soon), but to be honest is my favourite design of them all... We'll soon see what the client thinks when he takes my mock-ups to him to view.

Tuesday, 9 July 2013

Start Of The Summer Work: Moroccan Pattern Work

Yesterday, I began my first day at a graphic design company as an intern (and thankfully not the making cups of tea kind!) I've actually got some work to do! The office is fairly chilled out, with 3 of us as interns and a few 15 year olds on work experience running around and so far - so good. The only thing I'm not enjoying (and won't begin to) are the long days. 9am leave the house, 8pm arrive home :(

The first project I've been given however is a patterning project for a client starting up his own mobile Moroccan food van, so the aim was to create a pattern/design we could digitally print to cover it.

What's also challenging about working here is that the boss likes to do everything using Adobe Illustrator, which to me (at times) can seem like a nightmare! Anyways...


1. Outline created using the pen tool to mimic the shape of a Moroccan lamp

2. Filigree/Natural design found to fill in gaps and create a different look


3. Flower design created using multiple shapes (very messy)

3a. Cleaned up flower design with the star of Morocco in the centre


All of these small components had to be tested out in tiles / whatever design I thought would fit the van well and colour would be a key issue. Today I think I have finished my preliminary ideas. Tomorrow the big boss will hopefully tell me where to go from there on... 

More pictures to come...

Monday, 17 June 2013

Competition Time!


To try to keep myself in practice/my hand in the door sort-of speak, I am going to be trying to enter some design competitions over the summer and I recently found a new website (http://www.creativeallies.com) where this was possible!

The piece above was something I created using a similar pattern that I have previously displayed on this blog (but altered slightly to fit the competitions brief) as it seemed to tick most of the boxes that it was asking for. It is a commemorative piece of art designed for the music artist Woodkid to celebrate the release of his debut album, The Golden Age! 

Soon, I think there will be a chance for people to vote for their favourite entries so I am excited to get the link posted out as soon as thats possible! Fingers crossed my design can gain some good numbers!

Sunday, 14 April 2013

Creating a brand identity: Poster Promotion

These three screen shots are the three final ideas I had for promotional posters for a graphics project. The whole logo and theme of the brand is based around the old, retro play buttons on cassettes and personal stereos - but with a modern twist. Logically, I called the range 'Play' and Goji is the brand that I am designing for. 

The posters are just an accompaniment to a pattern and a packaging based project, but I thought it'd be nice to try to tie in a poster with it for additional content.


This first one for me makes no sense to the actual theme of the range that I've already created, but it does look nice! 


This for me is one of my favourite designs but it also doesn't fit the existing theme of the range, as it's very minimal texture with lots of white space and is meant to resemble a spray paint type effect with the gold. This is just very decorative. 


This one however DOES fit the style I've been working with and I've also tried to make it look like a paint drip to tie in with the look of the pattern. This is the one I will be developing a little more to make my final poster. All it will need is some added information about the brand and it's good to go!

Wednesday, 10 April 2013

My "Happy Mistake"

Last night I was trying to make a metallic-looking texture to use as a colour scheme for one of my projects. I'd made some spray paint patterns with gold spray but when I'd scanned them in they lost their shine and their glittery appearance so I looked online for a simple metallic background that I could use alongside the sprayed patterns and combine them somehow to create more texture.

I started off with two separate images:


The first the metallic surface I'd found and the second the spray paint texture I made. I tweaked the levels and using the blending mode 'Divide' on Photoshop my main tile was made.


This was the end result of that process. 

As I was using this to cover an A4 sized pattern, or at least part of it, I copied the layer a few times and rotated it, flipped it etc. So that it all blended in nicely together and so that when overlaid onto my pattern, there wouldn't be any harsh lines showing where a few images had been used and stuck next to each other to cover the entire page.

What I didn't realise however until long after I'd finished, is that the pattern I eventually made by piecing a few of these images together was something even nicer than what I had intended! 


This final result reminds me of a kaleidoscope effect, or even some sort of jewellery like amber or rose gold. I guess sometimes the coolest things do happen when you don't intend for them to! Or as my teacher once called things like this... "Happy Mistakes". (But that sounds a bit dodgy to me)

Tuesday, 9 April 2013

Making Texture With Spray Paint

Today I've been trying to make a sort of abstract pattern using spray paint. The purpose for it is to act as a colour scheme / texture scheme for a project I am working on involving creating an identity.

I tried spraying onto paper and then taking some of the paint back off with crumpled up magazine pages, which worked fine but the best effect I was able to create was made by spraying onto acetate and then extracting. 


This first image is done using white paper, but the magazine paper I used to pick select bits off the page couldn't take as much of the paint off the page as I wanted it to, to reveal more white underneath. 


This second image is much more successful and was created using acetate. Because it is transparent, when I scanned it in - the gaps became even more white due to the light scanning it. Double win! 
This is the image I'll be using for my final colour/texture scheme in project.


These two final images are just the paper I used to cover my floor so I didn't get paint on the carpet! The different layers of paper and acetate that were laid on them made a pretty cool pattern though! 

Saturday, 6 April 2013

My Book Design: Professionally Printed

I came home yesterday from a birthday trip and amongst some other packages, this beauty was waiting for me. If anything I think it excited me too much... But it looks so cool! And knowing I made it just adds to it. I feel sorta proud of something and it doesn't happen often!

So relieved that it's another thing I can now cross of the To Do list! :)


Thursday, 28 March 2013

Finished Book Design: Loco Motion

I have finally finished my Print on Demand book and I am very happy with it! I'm hoping the quality is as good on the printed version as the preview of it that I have of it online. It's taken such a long time to do and it's caused me a LOT of problems so I'm hoping it'll be worth it. 

You can actually preview my book by following the link here!


Here is the dust cover I have designed to wrap around my book. 

Tuesday, 26 March 2013

Print On Demand: Continued Development

I haven't posted anything in a while as I've taken a few days off due to it being Easter holidays and all. However in terms of work I'm just adding the finishing touches to my Print On Demand book for a bookmaking brief. I am slightly behind with this due to the time off I've taken but I'm hoping that by the end of the day it'll all be sorted and ready to be sent off to be printed! 

I think the hardest part is figuring out what kind of narrative/text I want to accompany the images.


Full spread preview


Close-up of selected pages (Unfinished)


Close-up of Line/Ribbon Detail

Sunday, 17 March 2013

Print On Design Book: In The Process

I haven't really done much work on my Bookmaking projects for a while and considering there is an informal assessment - but an assessment none the less is tomorrow I thought I best do something.

This is my plan (so far) for an abstracted Print On Demand book based around the theme of 'point' and displaying a days movements and encounters between different 'points'. 

There are still illustrations to be added, colour, page themes and and the ribbon needs to be finished with the correct colours and spacing, so there's still a lot to do. Liking the look of it so far though! 


Saturday, 16 March 2013

Animation: Sequence Sketches

Animation is currently taking up a lot of my time at the moment and no wonder when you have to draw every little movement in a different sketch! I'm trying to enjoy the process, and when I see the final sequence coming together the effort you've put in does make you feel good, it's just the hassle and stress whilst doing it that gets me down. Especially if you have to re-draw something that doesn't fit properly. Thankfully for these, tracing paper was a life saver and Im not that bothered that they change shape slightly. It'll make for an interesting transition I'm sure. 

These images are part of a sequence where my frog is looking up to catch a fly.

Friday, 15 March 2013

Animation: Background Design

I keep forgetting how long making one part of an animation takes! As part of my second scene I've started to create these layers, which will form part of a forest-type background for me to animate over the top of. To fit my running theme / style of illustration I've given them a white outline with painterly textures overlaid within the leaves. Something tells me this is going to take a lot longer than I had planned to make everything this way though. 

Bring on the sleepless nights! 


Friday, 8 March 2013

The Impossible Repeat Pattern

Designed for a brief and based around the Penrose Triangle (aka the impossible triangle) I made this repeat pattern, which was intended for a music accessories company to base a new range of products around. The idea for using a triangle came to me when I thought of the older, more nostalgic cassette players or boom boxes and their play, pause and stop buttons.

The triangle idea was further developed by me rationalising that if this pattern was intended for a range of music accessories, a key feature of this would be movement (both the musical side of it, and for the people that would be using it: people on the go). The Penrose triangle was thought of as it symbolises something that never stops and that is continuous and related well to music as that is also something that is constantly evolving and moving and changing direction.

I have made a small Ident (logo) to accompany this pattern, but both still need a colour scheme added to them. I'm quite looking forward to experimenting with this a bit further!  


Thursday, 7 March 2013

Re-Inventing A Book - Atlas Cutting

Today I began the long awaited task of recording the process of cutting up the atlas I bought for my bookmaking project, ready for the stencil layers (which I am still to cut) to go into. The stencil layers are going to display 5 different famous landmarks around the world and I thought that by cutting it from an atlas, it gives it a more meaningful state.

After I'd finished cutting the necessary layers out of the book, I noticed that some of the pages had been cropped into really interesting compositions - and these three are a few of my favourites! 

I plan on making a big montage of them in the near future, so keep your eyes peeled! The video of the whole process will also be released when it's been sped up so people don't have to sit through hours of footage before they get to see the final piece! :)

Tuesday, 5 March 2013

Book Illustration: Abstract Portraits

For one piece of coursework in the first term we were given a brief to illustrate a book to help tell the story. The book was Brave New World by Aldous Huxley, which if you have read it will know is quite abstract and strange in its own right. With this in mind I wanted the images I made to reflect the story and tone of the book. These are not what I have used as my final pieces as I feel the intense colours were not a true representation of the darkness of the world in which the book is set, but are part of the process to getting there.


Saturday, 2 March 2013

Style Tests: Glass Frog

As part of my animation I've started experimenting with different styles in which to draw my Frog for the sequence. I found one geometric style by Matthew DiVito, which really caught my eye and made me want to try it for myself... So I did. 

As much as I love it though, I think I'd be making things more complicated than they need to be with this particular style. I do love it though. He looks like a piece of ceramic in the 4th image!